The purpose of this document is to show you how to adjust your knobs to sit closer to your guitar body.
If you ever looked at older or historic Gibson Les Paul guitars you might have noticed that the knobs sit pretty high off the guitar body. On newer Gibson USA guitars the knobs sit nice and close. There is lots of information on the internet that suggest the pots can be adjusted lower into the guitar body to make the knobs sit closer. The problem is not the pots but the knobs.
| Here is a picture of the underside of a new Gibson Speed knob compared to a vintage style speed knob. |  |
If you look at the center on the control you can see the difference. The center of the knob on the left is recessed into the knob compared to one on the right. This is what causes the knobs to sit about 1/8” higher.
 |
Here is a side picture of bell knobs installed on a Les Paul. There is nothing wrong with this picture if it’s a historic or a vintage Gibson Les Paul guitar. This is the way they came brand new. |
|
Now here is a picture of the same guitar with a set of modified bell knobs. |
 |
 |
Here is a side view of both style of bell knobs on the guitar. |
Most of the knobs we sell here at Philadelphia Luthier Tools & Supplies are the vintage style. They will sit approximately 1/8” above the guitar body. If you would like to adjust your knobs to sit closer to the body it is very easy to do.
What you will need:
- ½” spade bit
- Cordless drill with a low speed setting
- A bench grinder (to modify the spade bit a little)
- Gold or black touch-up paint
- Painters tape
First thing you will need to do is modify the ½” spade bit. You will need to grind just the tip of the spade bit down to about 1/8”. This is done so you don’t damage the paint on the inside of the knob.
 |
 |
 |
Next install the bit into your drill. If your drill has a speed setting you will want to set it to its slowest speed. What you a going to do is start grinding down the center section of knob. My recommendation would be to go a little at a time until you get the knob at just the right height. Try not to go too far or your knobs will rub the guitar body. There is no reversing it if you take too much off. Also hold your drill and knob so your taking material off equally all the way around and try not to grind too much from the inside center where the control shaft slides into.
Here is some pictures.
 |
 |
What the knobs look like after modifying them.
 |
 |
Once you finish one knob you can make the other four match very easily by measuring the depth with a small ruler.
You will notice that the center section that was grinded off doesn’t have any paint on it anymore. I like to paint that section so you can’t see it when you looking straight at the knob. Any gold paint will do for the amber or gold knobs and black paint for the black knobs. The section is very small and isn’t very noticeable. You could spray or brush the paint on with hobby paint(nail polish also works great).
 |
 |
|
Mask the knobs if you’re going to use spray paint. Use light coats so you don’t get too much paint into the center. It will make the knob hard to install. |
 |
 |
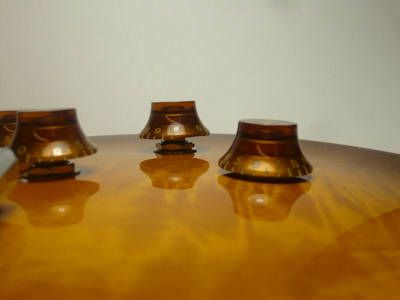
This is a picture of the guitar before modifying the knobs. |
|
And the finished amber bell knobs on a Gibson Les Paul Traditional! |
 |